
Accurate container measurements are the starting point for a well-fitting custom shrink sleeve label. A difference of only a few millimeters can affect sleeve coverage, seam position, application stability, and the final appearance after shrinking. This is especially important for containers with pronounced shoulders, tapered sides, oval bodies, recessed panels, or irregular bases.
This guide explains what packaging buyers should measure before requesting a quotation. The final layflat width, sleeve cut height, seam allowance, and artwork distortion template should always be calculated and confirmed by the shrink sleeve converter after reviewing the actual production container.
What You Need Before Measuring
Prepare the actual production container whenever possible. A prototype or drawing may not perfectly match the final container. If the cap, pump, lid, or closure will be fitted during sleeve application, assemble it before measuring.
Useful measuring tools include:
- a flexible measuring tape;
- a digital caliper for precise diameters and smaller features;
- a straight ruler for vertical dimensions;
- a non-stretch string and ruler if a flexible tape is unavailable;
- a marker or removable tape for identifying the desired sleeve edges; and
- a camera or mobile phone for recording the measurement positions.
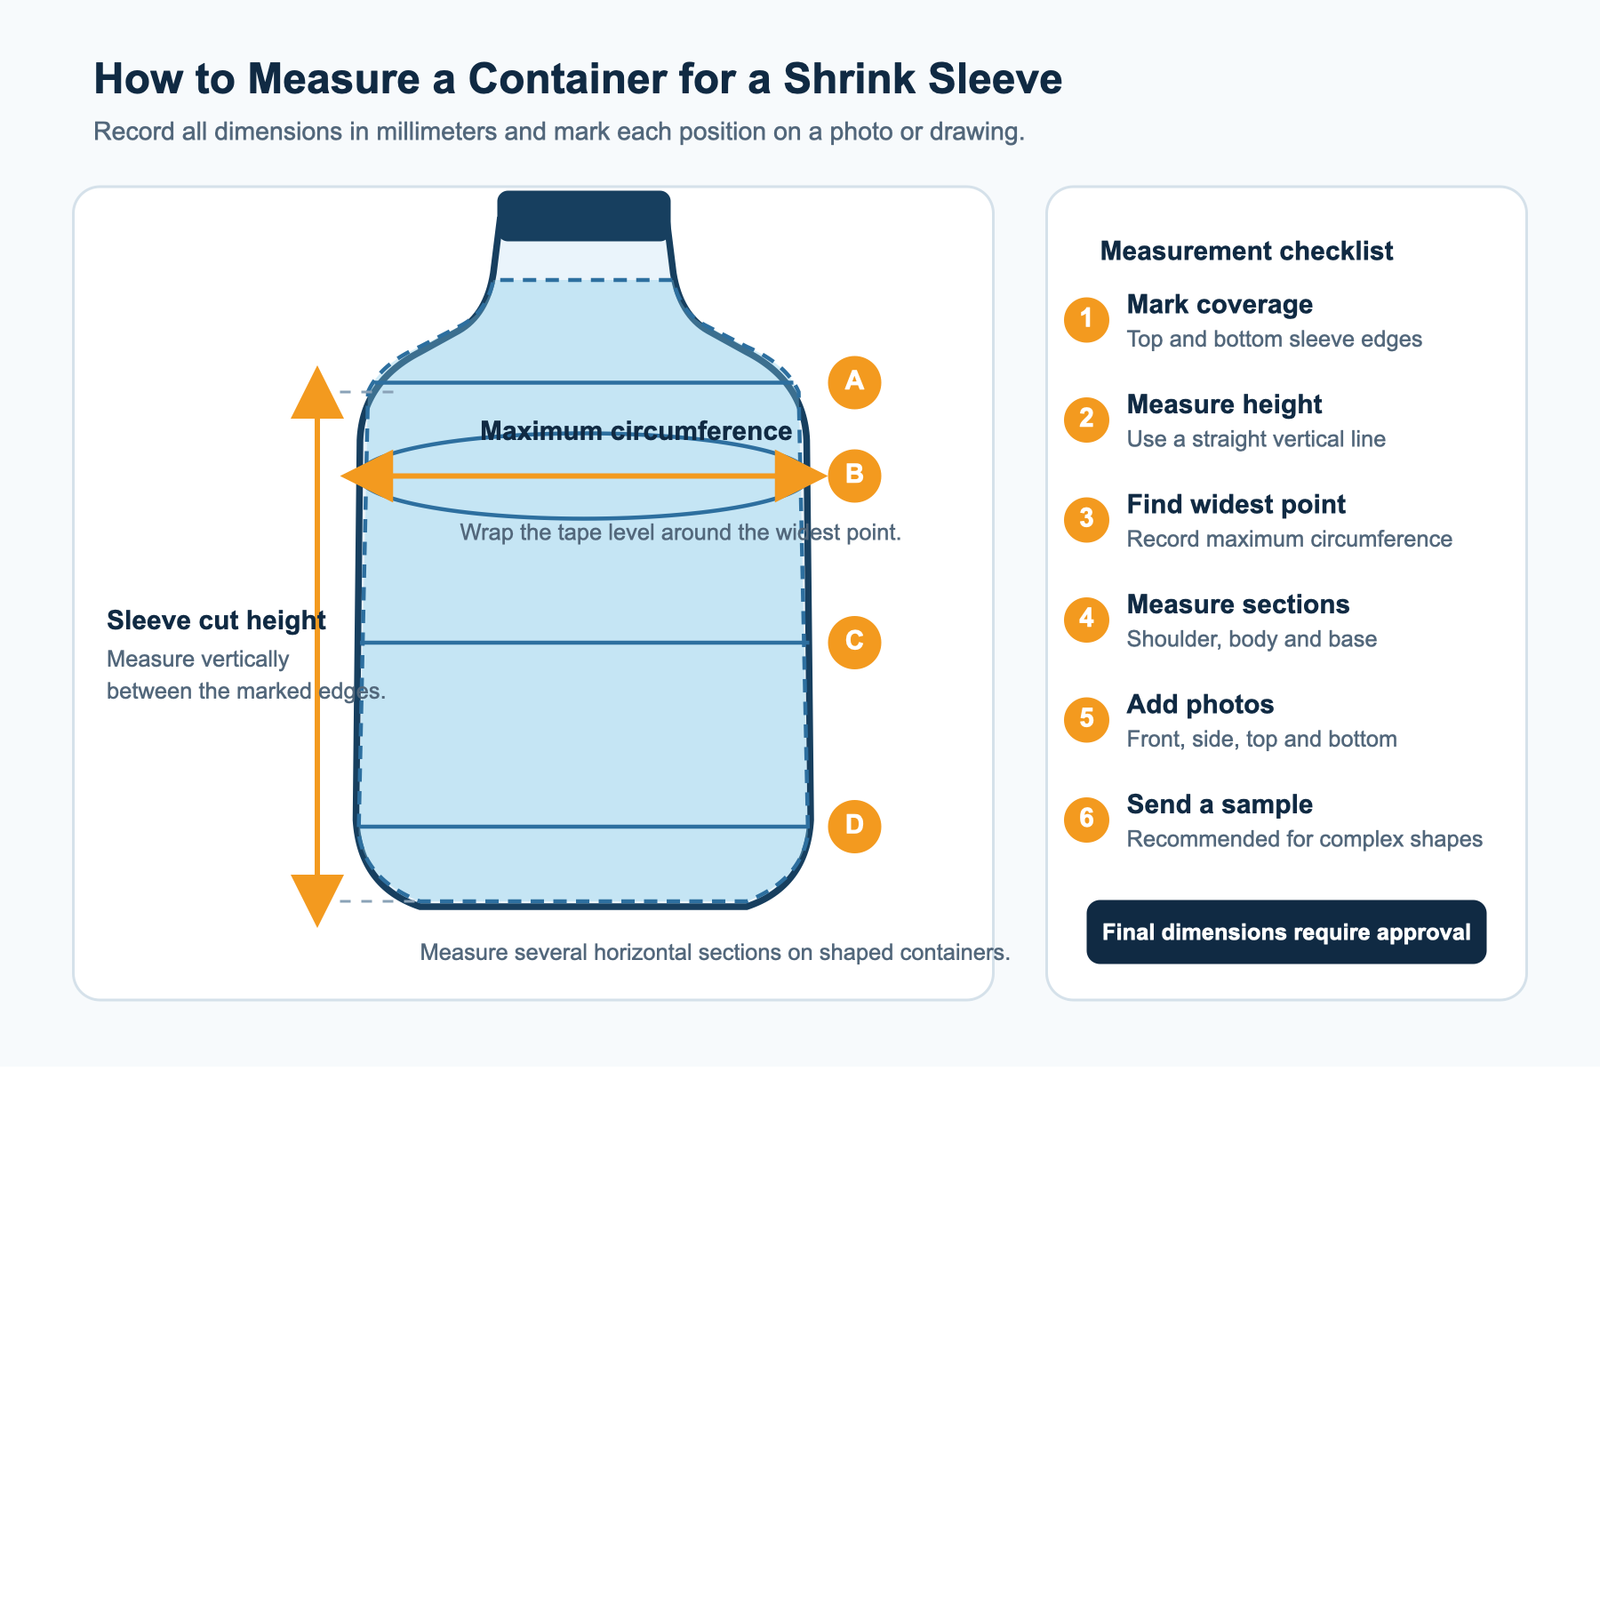
Step 1: Decide the Sleeve Coverage Area
First decide where the top and bottom edges of the finished sleeve should sit. The sleeve may cover the full body, only the main label panel, or part of the cap for tamper evidence. Mark both edges directly on a sample container with removable tape.
Check whether the sleeve must avoid a pump, dispensing opening, grip area, date-code position, recycling mark, or structural feature. If the sleeve covers a cap or closure, tell the supplier whether a perforation or tear strip is required.
Step 2: Measure the Sleeve Height
Measure vertically from the proposed top edge to the proposed bottom edge. Keep the ruler parallel to the centerline of the container. Do not follow the curved surface with a flexible tape when measuring height, because this can produce a longer value than the required sleeve cut height.
Record the result in millimeters. If the front and back profiles are different, measure both sides and provide photographs showing exactly where each measurement was taken.
Step 3: Measure the Maximum Circumference
Wrap a flexible tape around the widest point within the planned sleeve area. Keep the tape level and comfortably against the container without pulling it tight. Record the maximum circumference in millimeters.
If you use string, make sure it does not stretch. Mark the meeting point, lay the string flat, and measure its length with a ruler.
For a straight round container, the maximum circumference may be easy to identify. For an oval, square, tapered, or sculpted container, check several positions. The widest section may be at the shoulder, main body, or base.
Step 4: Record Circumference at Several Heights
One maximum measurement is not enough for a strongly shaped container. Measure the circumference at important horizontal sections, such as:
- near the top edge of the sleeve;
- across the shoulder;
- around the upper body;
- around the middle body;
- around the lower body; and
- near the bottom edge of the sleeve.
Label these positions A, B, C, D, and so on. Add the same letters to a side-view photograph or drawing. This makes the data easier for the prepress team to understand and helps identify high-shrink areas.
Step 5: Measure Width and Depth for Oval or Rectangular Containers
For an oval, square, or rectangular container, also measure the maximum front-to-back depth and side-to-side width with a caliper. Record rounded corners, recessed panels, handles, ribs, and other features that may influence how the film shrinks.
Do not calculate the sleeve only from the visible front width. Shrink sleeve dimensions relate to the complete container perimeter, including sides and corners.
Step 6: Measure the Shoulder, Neck, and Base
Steep shoulders and narrow necks create larger differences in shrink demand. Record the neck diameter or circumference, shoulder height, maximum body width, and the transition between these areas.
At the bottom, check whether the bottle has a curved heel, raised base, or recessed ring. Confirm whether the sleeve should end above the curve or continue around it. Leaving the decision unclear can affect the final edge position.
Step 7: Photograph the Container with Measurement Marks
Provide clear front, back, side, top, and bottom photographs. Include a ruler in at least one image for scale. Show the marked sleeve edges and every measurement position.
Photographs do not replace dimensions, but they help the manufacturer interpret them correctly. They are particularly useful when the bottle is asymmetric or includes features that are difficult to describe in an email.
Do Not Use Circumference Alone as the Final Sleeve Width
Buyers sometimes divide the circumference by two and treat the result as the finished layflat width. That calculation is only a preliminary reference. The production layflat width may also depend on film type and thickness, seam construction, converting tolerance, container profile, shrink performance, and application conditions.
Provide the measured container data and let the shrink sleeve converter calculate and confirm the production dimensions. Do not finalize the artwork or distortion template before this technical review.
Suggested Container Measurement Record
To avoid confusion, submit a simple measurement record with the following fields:
| Item | What to Record |
|---|---|
| Container reference | Product name, SKU, drawing number, or sample identification |
| Sleeve coverage | Marked top and bottom edge positions |
| Sleeve cut height reference | Straight vertical distance between the proposed edges |
| Maximum circumference | Widest perimeter inside the sleeve coverage area |
| Section measurements | Circumference at positions A, B, C, D, and other critical levels |
| Width and depth | Required for oval, square, and rectangular profiles |
| Closure configuration | Cap, pump, lid, or tamper-evident coverage details |
| Units | Millimeters (mm) throughout the record |
The converter will use this information for technical evaluation. It is not a substitute for the final approved sleeve specification.
Common Measuring Mistakes
- measuring a different container from the one used in production;
- measuring height along a curved surface instead of vertically;
- pulling the flexible tape too tightly;
- recording only the body diameter and ignoring the shoulder or base;
- using inches without identifying the unit;
- rounding measurements too early;
- forgetting to assemble the cap or pump;
- sending dimensions without photographs or marked positions; and
- starting final artwork before the sleeve template is approved.
Information to Send with Your Measurement Sheet
For an accurate technical review and quotation, send:
- container material and product application;
- all dimensions in millimeters;
- front, side, top, and bottom photographs;
- the desired sleeve coverage area;
- physical samples, when available;
- estimated order quantity and number of designs;
- artwork status;
- application and shrinking method, if known;
- destination country; and
- required delivery date.


Why a Physical Fit Test Is Still Recommended
Measurements are essential, but they cannot fully predict film behavior on every curved surface. For a new or complex container, a physical fit test helps confirm layflat width, sleeve cut height, edge position, seam location, graphic distortion, and opening requirements before mass production.
Haosen Packaging produces custom printed shrink sleeve labels for shaped bottles and consumer packaging applications. Send us your container photos, dimensions, artwork, quantity, and delivery requirements. Our team can review the information and identify any measurements that need confirmation before quotation.
Request a custom shrink sleeve label quotation or contact us through WhatsApp: +86 189 2692 9937.
Reviewed by the Haosen Packaging production team.